|
[worked left to right ][first strand in bottom layer] |
|
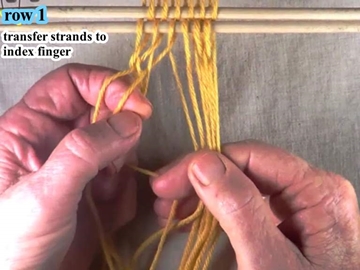
Row 1 This part of the diagonally interlaced fingerweaving tutorial will be worked from the left hand side of the workpiece to the right hand side of the workpiece. The shed is picked up on the index finger of the right hand. The bottom layer of the shed is under the index finger. The top layer of the shed is over the index finger. [NOTE] The headstick is set up so that the first strand on the left hand side of the workpiece is in the bottom layer of the shed. |
[figure-1]

|
| Go to: Top of page | Next |
|
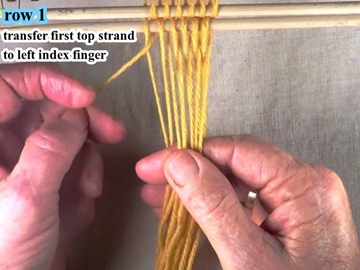
Row 1
Transfer the first top shed layer strand on the left hand side of the workpiece to the left hand so that it is under the index finger. [NOTE] This action thurns the strand back into the workpiece. [OBSERVE] The next two srands are in the bottom layer of the shed. |
[figure-2]
[click here to see video]
|
| Previous | Next |
|
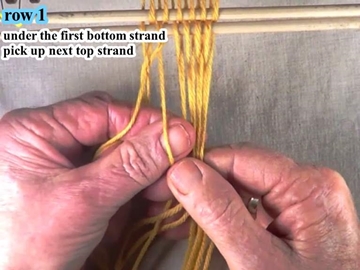
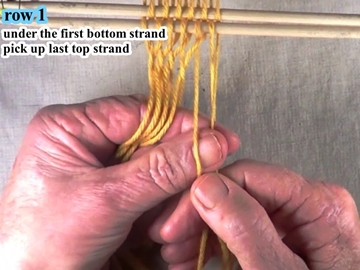
Row 1
Use the thumb and index finger to reach under the first of the two bottom strands. Then pick up the next top layer shed strand. |
[figure-3]
[click here to see video]

|
| Previous | Next |
|
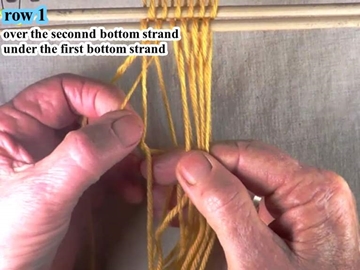
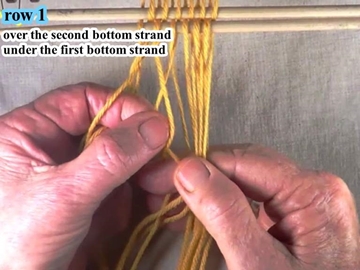
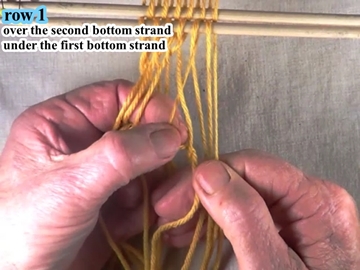
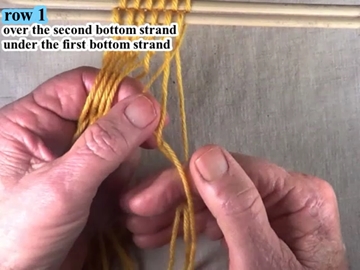
Row 1
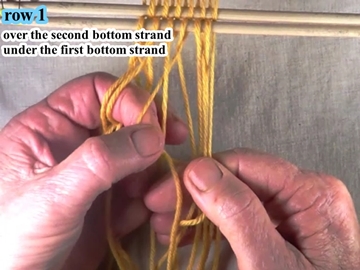
Pull the next top layer shed strand over the adjacent bottom shed strand and under the first bottom shed strand. [OBSERVE] The over/under configuration of the strands held by the right hand. |
[figure-4]
[click here to see video]
|
| Previous | Next |
|
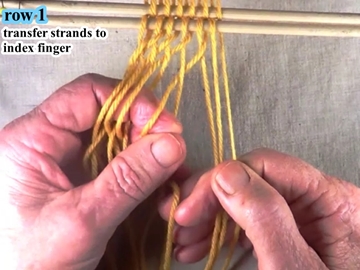
Row 1
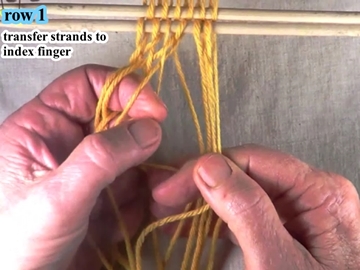
Transfer the next two strands to the index finger of the left hand. [OBSERVE] The over/under configuration of the strands that have been transferred to the index finger. [OBSERVE] The top strand that was pulled to the left is still in the top layer of the shed (over the index finger). [OBSERVE] The next two strands are in the bottom layer. |
[figure-5]
[click here to see video]

|
| Previous | Next |
|
Row 1
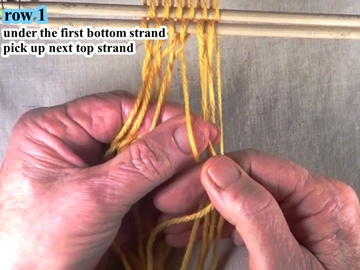
Use the thumb and index finger of the left hand to reach under the the first of the next two bottom layer shed strands. Then pick up the next top layer shed strand. |
[figure-6]
[click here to see video]
|
| Previous | Next |
|
Row 1
Pull the next top layer shed strand over the adjacent bottom shed strand and under the next bottom shed strand. [OBSERVE] The over/under configuration of the strands that have been transferred to the left hand index finger. |
[figure-7]
[click here to see video]
|
| Previous | Next |
|
Row 1
Transfer the next two strands to the index finger of the left hand. [OBSERVE] The over/under configuration of the strands that have been transferred to the index finger. [OBSERVE] The top strand that was pulled to the left is still in the top layer of the shed (over the index finger). [OBSERVE] The next two strands are in the bottom layer of the shed. |
[figure-8]
[click here to see video]
|
| Previous | Next |
|
Row 1
Use the thumb and index finger to reach under the the first of the next two bottom layer shed strands. Then pick up the next top layer shed strand. |
[figure-9]
[click here to see video]

|
| Previous | Next |
|
Row 1
Pull the next top layer shed strand over the adjacent bottom shed strand and under the next bottom shed strand. [OBSERVE] The over/under configuration of the strands that have been transferred to the left hand index finger. |
[figure-10]
[click here to see video]
|
| Previous | Next |
|
Row 1
Transfer the next two strands to the index finger of the left hand. [OBSERVE] The over/under configuration of the strands that have been transferred to the index finger. [OBSERVE] The top strand that was pulled to the left is still in the top layer of the shed (over the index finger). [OBSERVE] The next two strands are in the bottom layer of the shed. |
[figure-11]
[click here to see video]
|
| Previous | Next |
|
Row 1
Use the thumb and index finger to reach under the the first of the next two bottom layer shed strands. Then pick up the next top layer shed strand. |
[figure-12]
[click here to see video]
|
| Previous | Next |
|
Row 1
Pull the next top layer shed strand over the adjacent bottom shed strand and under the next bottom shed strand. [OBSERVE] The over/under configuration of the strands that have been transferred to the left hand index finger. |
[figure-13]
[click here to see video]
|
| Previous | Next |
|
Row 1
Transfer the next two strands to the index finger of the left hand. [OBSERVE] The over/under configuration of the strands that have been transferred to the index finger. [OBSERVE] The top strand that was pulled to the left is still in the top layer of the shed (over the index finger). [OBSERVE] The next two strands are in the bottom layer of the shed. |
[figure-14]
[click here to see video]
|
| Previous | Next |
|
Row 1
Use the thumb and index finger of the left hand to reach under the the first of the next two bottom layer shed strands. Then pick up the next top layer shed strand. |
[figure-15]
[click here to see video]
|
| Previous | Next |
|
Row 1
Pull the next top layer shed strand over the adjacent bottom shed strand and under the next bottom shed strand. [OBSERVE] The over/under configuration of the strands that have been transferred to the left hand index finger. |
[figure-16]
[click here to see video]
|
| Previous | Next |
|
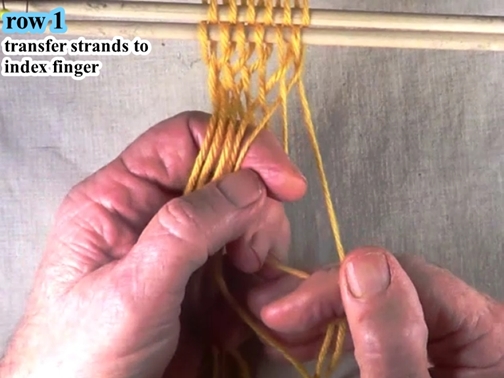
Row 1
Transfer the next two strands to the index finger of the left hand. [OBSERVE] The over/under configuration of the strands that have been transferred to the index finger. [OBSERVE] The top strand that was pulled to the left is still in the top layer of the shed (over the index finger). [OBSERVE] The next two strands are in the bottom layer of the shed. |
[figure-17]
[click here to see video]
|
| Previous | Next |
|
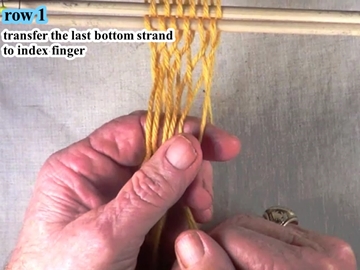
Row 1
Transfer the last bottom shed layer strand to the top of the left hand index finger. [NOTE] This action turns the last bottom strand of the shed back into the workpiece. [OBSERVE] The over/under configuration of the strands that have been transferred to the left hand index finger. |
[figure-18]
[click here to see video]
|
| Previous | Next |
|
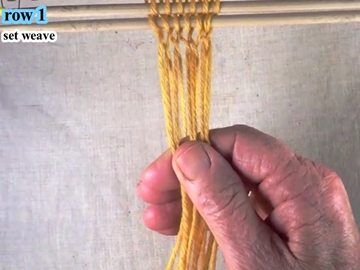
Row 1
Set the weave by pulling the layers of the shed in opposite directions. Check to see that each individual strand is snug and even. |
[figure-19]
[click here to see video]
|
| Previous | Next |
|
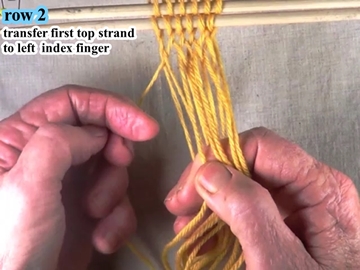
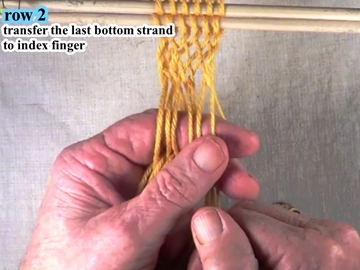
Row 2
Transfer the first top shed layer strand on the left hand side of the workpiece to the left hand so that it is under the index finger. [NOTE] This action thurns the strand back into the workpiece. [OBSERVE] The next two srands are in the bottom layer of the shed. |
[figure-20]
[click here to see video]
|
| Previous | Next |
|
Row 2
Use the thumb and index finger to reach under the the first of the next two bottom layer shed strands. Then pick up the next top layer shed strand. |
[figure-21]
[click here to see video]
|
| Previous | Next |
|
Row 2
Pull the next top layer shed strand over the adjacent bottom shed strand and under the next bottom shed strand. [OBSERVE] The over/under configuration of the strands that have been transferred to the left hand index finger. |
[figure-22]
[click here to see video]
|
| Previous | Next |
|
Row 2
Transfer the next two strands to the index finger of the left hand. [OBSERVE] The over/under configuration of the strands that have been transferred to the index finger. [OBSERVE] The top strand that was pulled to the left is still in the top layer of the shed (over the index finger). [OBSERVE] The next two strands are in the bottom layer of the shed. |
[figure-23]
[click here to see video]

|
| Previous | Next |
|
Row 2
Use the thumb and index finger to reach under the the first of the next two bottom layer shed strands. Then pick up the next top layer shed strand. |
[figure-24]
[click here to see video]
|
| Previous | Next |
|
Row 2
Pull the next top layer shed strand over the adjacent bottom shed strand and under the next bottom shed strand. [OBSERVE] The over/under configuration of the strands that have been transferred to the left hand index finger. |
[figure-25]
[click here to see video]
|
| Previous | Next |
|
Row 2
Transfer the next two strands to the index finger of the left hand. [OBSERVE] The over/under configuration of the strands that have been transferred to the index finger. [OBSERVE] The top strand that was pulled to the left is still in the top layer of the shed (over the index finger). [OBSERVE] The next two strands are in the bottom layer. |
[figure-26]
[click here to see video]

|
| Previous | Next |
|
Row 2
Use the thumb and index finger to reach under the the first of the next two bottom layer shed strands. Then pick up the next top layer shed strand. |
[figure-27]
[click here to see video]
|
| Previous | Next |
|
Row 2
Pull the next top layer shed strand over the adjacent bottom shed strand and under the next bottom shed strand. [OBSERVE] The over/under configuration of the strands that have been transferred to the left hand index finger. |
[figure-28]
[click here to see video]
|
| Previous | Next |
|
Row 2
Transfer the next two strands to the index finger of the left hand. [OBSERVE] The over/under configuration of the strands that have been transferred to the index finger. [OBSERVE] The top strand that was pulled to the left is still in the top layer of the shed (over the index finger). [OBSERVE] The next two strands are in the bottom layer. |
[figure-29]
[click here to see video]
|
| Previous | Next |
|
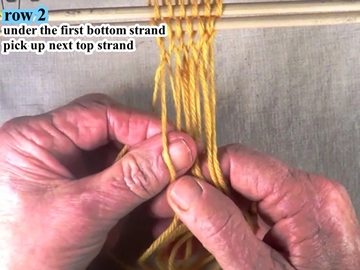
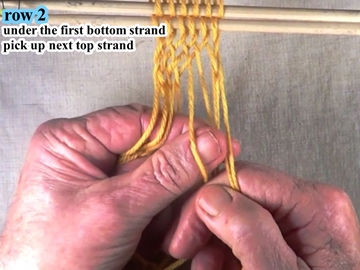
Row 2
Use the thumb and index finger to reach under the the first of the next two bottom layer shed strands. Then pick up the next top layer shed strand. |
[figure-30]
[click here to see video]
|
| Previous | Next |
|
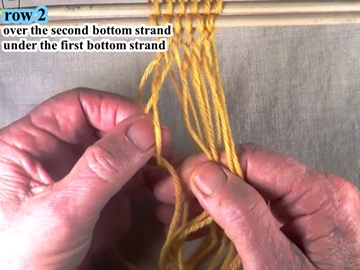
Row 2
Pull the next top layer shed strand over the adjacent bottom shed strand and under the next bottom shed strand. [OBSERVE] The over/under configuration of the strands that have been transferred to the left hand index finger. |
[figure-31]
[click here to see video]
|
| Previous | Next |
|
Row 2
Transfer the next two strands to the index finger of the left hand. [OBSERVE] The over/under configuration of the strands that have been transferred to the index finger. [OBSERVE] The top strand that was pulled to the left is still in the top layer of the shed (over the index finger). [OBSERVE] The next two strands are in the bottom layer. |
[figure-32]
[click here to see video]
|
| Previous | Next |
|
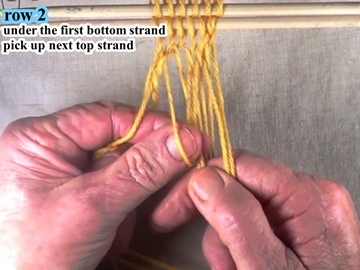
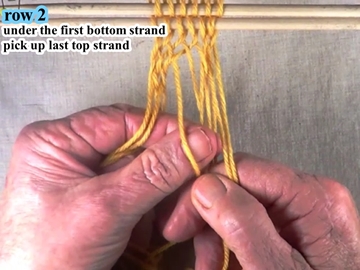
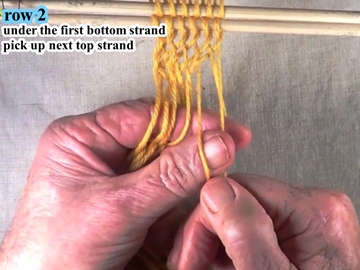
Row 2
Use the thumb and index finger to reach under the the first of the next two bottom layer shed strands. Then pick up the next top layer shed strand. |
[figure-33]
[click here to see video]
|
| Previous | Next |
|
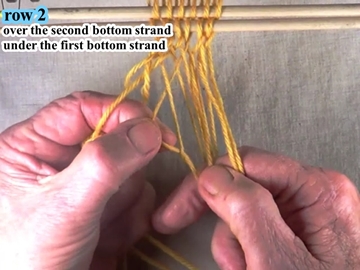
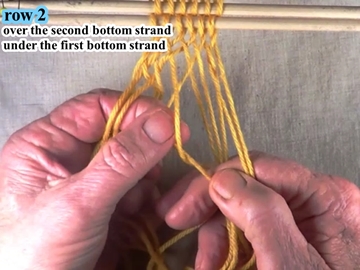
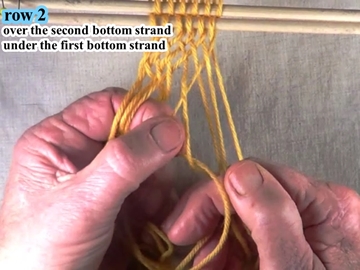
Row 2
Pull the next top layer shed strand over the adjacent bottom shed strand and under the next bottom shed strand. [OBSERVE] The over/under configuration of the strands that have been transferred to the left hand index finger. |
[figure-34]
[click here to see video]

|
| Previous | Next |
|
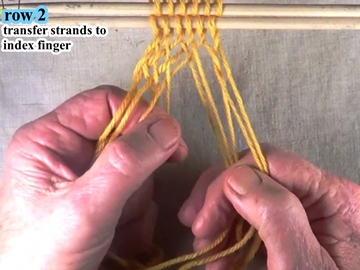
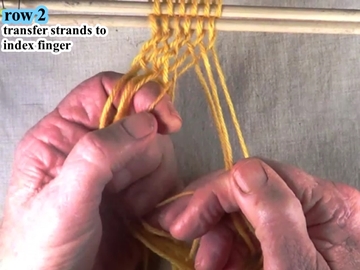
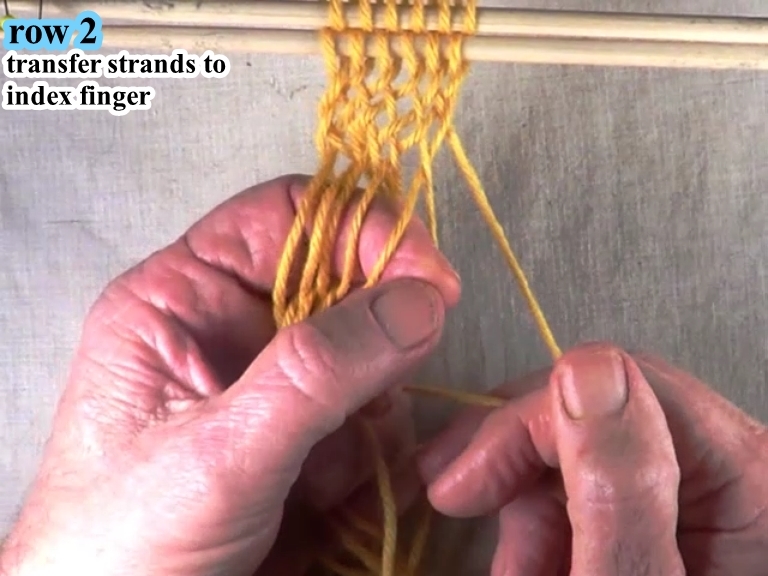
Row 2
Transfer the next two strands to the index finger of the left hand. [OBSERVE] The over/under configuration of the strands that have been transferred to the index finger. [OBSERVE] The top strand that was pulled to the left is still in the top layer of the shed (over the index finger). [OBSERVE] The next two strands are in the bottom layer. |
[figure-35]
[click here to see video]
|
| Previous | Next |
|
Row 2
Transfer the last bottom shed layer strand to the top of the left hand index finger. [NOTE] This sction turns the last bottom strand back into the workpiece. [OBSERVE] The over/under configuration of the strands that have been transferred to the left hand index finger. |
[figure-36]
[click here to see video]
|
| Previous | Next |
|
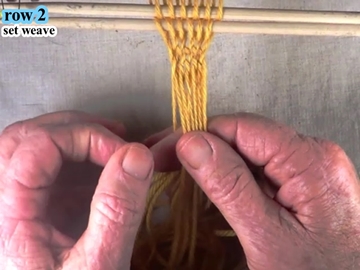
Row 2
Set the weave by pulling the layer of the shed in opposite directions. Check to see that each individual strand is snug and even. |
[figure-37]
[click here to see video]
|
| Previous | Next |
|
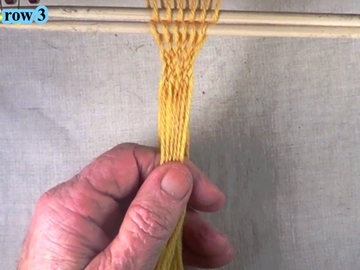
Row 3
Weave row 3 by following the setps presented for weaving rows one and two. Continue adding rows of weaving untill the the workpiece has reached the desired length. |
[figure-38]
[click here to see video]
|
| Previous | go to top of page |